LLaMAFactory Code Analysis
Published:
This blog post documents my learning process of the LLaMAFactory code repository.
1. 从命令行定位到程序入口
我们首先从 example 文件中找到启动命令:examples/README_zh.md
llamafactory-cli train examples/train_lora/llama3_lora_sft.yaml
如果之前没接触过,那么首先遇到的问题是 llamafactory-cli 是什么?
llamafactory-cli 是 LLaMA-Factory 提供的一个命令行工具,用于统一执行训练、推理、评估、导出等任务,我们来看看llamafactory-cli 是怎么工作的:
首先,官方 README 文档中 Getting Start 表明,Install from Source 需要有一行命令
pip install -e ".[torch,metrics]" --no-build-isolation
其中,
pip install -e 表示 editable install,表示可编辑安装,它不会把你的源码拷贝到 site-packages,而是创建一个指向源码目录的软链接。优点是修改源码后,立刻生效,不用重新安装,特别适合开发调试。.[torch,metrics] 中
. 表示当前目录是一个 python 项目,有 setup.py 或 pyproject.toml,如果检测到你项目里有 pyproject.toml 并声明了 [build-systerm],pip 会默认启用 build isolation。在 LlaMA Factory 中,我们看 pyproject.toml 中存在:
[build-system]
requires = ["setuptools>=61.0"]
build-backend = "setuptools.build_meta"
那么此时会分别执行:
- 创建临时环境
- 安装 setuptools≥61.0
- 使用 setuptools.build_meta 构建 wheel,即静态读取 setup.py 中调用的参数(不运行 main 函数),随后构建 wheel 包
我们继续看 setup.py 中的 main 函数:
def main():
    setup(
        name="llamafactory",
        version=get_version(),
        author="hiyouga",
        author_email="hiyouga@buaa.edu.cn",
        description="Unified Efficient Fine-Tuning of 100+ LLMs",
        long_description=open("README.md", encoding="utf-8").read(),
        long_description_content_type="text/markdown",
        keywords=["AI", "LLM", "GPT", "ChatGPT", "Llama", "Transformer", "DeepSeek", "Pytorch"],
        license="Apache 2.0 License",
        url="https://github.com/hiyouga/LLaMA-Factory",
        package_dir={"": "src"},
        packages=find_packages("src"),
        python_requires=">=3.9.0",
        install_requires=get_requires(),
        extras_require=extra_require,
        entry_points={"console_scripts": get_console_scripts()},
        classifiers=[
            "Development Status :: 4 - Beta",
            "Intended Audience :: Developers",
            "Intended Audience :: Education",
            "Intended Audience :: Science/Research",
            "License :: OSI Approved :: Apache Software License",
            "Operating System :: OS Independent",
            "Programming Language :: Python :: 3",
            "Programming Language :: Python :: 3.9",
            "Programming Language :: Python :: 3.10",
            "Programming Language :: Python :: 3.11",
            "Programming Language :: Python :: 3.12",
            "Topic :: Scientific/Engineering :: Artificial Intelligence",
        ],
    )
我们一步步拆解,看它是怎么构建 wheel 的。
name="llamafactory"+version=get_version():决定了 .whl 的文件名packages=find_packages("src")+package_dir={"": "src"}:find_packages("src")会在 src/ 下递归查找所有含有 init.py 的目录(也就是 Python 包),package_dir={"": "src"}表示将逻辑上的顶级模块路径 “” 映射到 src/ ,就是说:llamafactory 这个顶层模块,其实物理路径是 src/llamafactory。总的来说,这是告诉 setuptools:你应该去 src/ 目录中查找所有源码/包。install_requires=get_requires():安装时所需要的依赖包,我们可以进去看一下:def get_requires() -> list[str]: with open("requirements.txt", encoding="utf-8") as f: file_content = f.read() lines = [line.strip() for line in file_content.strip().split("\n") if not line.startswith("#")] return linesextras_require=extra_require:构建额外依赖entry_points={"console_scripts": get_console_scripts()}:我们看下 get_console_scripts() 函数:def get_console_scripts() -> list[str]: console_scripts = ["llamafactory-cli = llamafactory.cli:main"] if os.getenv("ENABLE_SHORT_CONSOLE", "1").lower() in ["true", "y", "1"]: console_scripts.append("lmf = llamafactory.cli:main") return console_scripts这其实指出了前面我们所困惑的
llamafactory-cli是个什么东西,它其实就是llamafactory.cli:main,即运行命令行llamafactory-cli,系统会自动指向模块llamafactory/cli.py中的main()函数,我们简单看一下其中关键部分:COMMAND_MAP = { "api": run_api, "chat": run_chat, "env": print_env, "eval": run_eval, "export": export_model, "train": run_exp, "webchat": run_web_demo, "webui": run_web_ui, "version": partial(print, WELCOME), "help": partial(print, USAGE), } command = sys.argv.pop(1) if len(sys.argv) > 1 else "help" if command == "train" and (is_env_enabled("FORCE_TORCHRUN") or (get_device_count() > 1 and not use_ray())): ... elif command in COMMAND_MAP: COMMAND_MAP[command]() else: print(f"Unknown command: {command}.\n{USAGE}")到这里就很明显了,当运行命令行
llamafactory-cli train实际上就是用 sys.argv.pop(1) 提取了 train,并通过 COMMAND_MAP 字典将其映射为 run_exp,当使用 Ray 分布式训练框架时,直接运行 run_exp() 函数。COMMAND_MAP 告诉了我们,不同运行模式下的启动入口在哪。
[torch,metrics] 是前面提到的可选环境依赖。
--no-build-distribution 表示不使用隔离环境来构建项目,目的是为了避免重复下载依赖。
最后,这些被解析的参数会最终形成一个 wheel,通过 pip install 安装构建环境。
2. 解析 train 模式下的 run_exp()
run_exp() 路径:src/llamafactory/train/tuner.py
def run_exp(args: Optional[dict[str, Any]] = None, callbacks: Optional[list["TrainerCallback"]] = None) -> None:
    args = read_args(args)
    if "-h" in args or "--help" in args:
        get_train_args(args)

    ray_args = get_ray_args(args)
    callbacks = callbacks or []
    if ray_args.use_ray: # 是否调用 Ray 分布式训练
		    # RayTrainReportCallback(), Ray回调类, 将每一轮训练的metrics汇报给Ray
        callbacks.append(RayTrainReportCallback())
        trainer = get_ray_trainer(
            training_function=_training_function,
            train_loop_config={"args": args, "callbacks": callbacks},
            ray_args=ray_args,
        )
        trainer.fit()
    else:
        _training_function(config={"args": args, "callbacks": callbacks})
read_args() 函数的作用是读取配置参数:
- 如果传入字典、列表,那么直接返回;
- 如果传入yaml文件、json文件,那么转化为字典类型:
def read_args(args: Optional[Union[dict[str, Any], list[str]]] = None) -> Union[dict[str, Any], list[str]]:
    r"""Get arguments from the command line or a config file."""
    if args is not None:  # 如果传入 dict 或 list,直接返回
        return args

    if sys.argv[1].endswith(".yaml") or sys.argv[1].endswith(".yml"):
        override_config = OmegaConf.from_cli(sys.argv[2:]) # OmegaConf.from_cli, 从命令行解析并加载
        dict_config = OmegaConf.load(Path(sys.argv[1]).absolute()) # OmegaConf.load, 加载配置文件
        return OmegaConf.to_container(OmegaConf.merge(dict_config, override_config))  # merge dict_config和override_config, 并转化为python字典
    elif sys.argv[1].endswith(".json"):
        override_config = OmegaConf.from_cli(sys.argv[2:])
        dict_config = OmegaConf.load(Path(sys.argv[1]).absolute())
        return OmegaConf.to_container(OmegaConf.merge(dict_config, override_config))
    else:
        return sys.argv[1:]
get_ray_args() 函数如下:
def get_ray_args(args: Optional[Union[dict[str, Any], list[str]]] = None) -> RayArguments:
    parser = HfArgumentParser(RayArguments) # 返回一个将 dict, list, 命令行等配置解析为 RayArguments dataclass 的解析器
    (ray_args,) = _parse_args(parser, args, allow_extra_keys=True) # _parse_args 返回参数的 dataclass,即一个 RayArguments ,返回 tuple 形式
    return ray_args
它的作用是返回一个 RayArguments 的 dataclass 类,返回形式为 tuple。
- HfArgumentParser() 返回一个解析器 parser,它将字典、列表、命令行等参数配置解析为一种 RayArguments 的 dataclass 类。
_parser_args() 返回参数的 dataclass,即一个 RayArguments ,返回 tuple 形式。
  def _parse_args(
      parser: "HfArgumentParser", args: Optional[Union[dict[str, Any], list[str]]] = None, allow_extra_keys: bool = False
  ) -> tuple[Any]:
      args = read_args(args) # read_args(), 返回存储参数配置的dict或list
      if isinstance(args, dict): # 将dict解析为dataclass
          return parser.parse_dict(args, allow_extra_keys=allow_extra_keys)

  		# 将list解析为dataclass,设置return_remaining_strings=True后,无法解析的str返回不报错
      (*parsed_args, unknown_args) = parser.parse_args_into_dataclasses(args=args, return_remaining_strings=True)

      if unknown_args and not allow_extra_keys:
          print(parser.format_help())
          print(f"Got unknown args, potentially deprecated arguments: {unknown_args}")
          raise ValueError(f"Some specified arguments are not used by the HfArgumentParser: {unknown_args}")

      return tuple(parsed_args)
_training_function() 函数如下:
def _training_function(config: dict[str, Any]) -> None:
    args = config.get("args")
    callbacks: list[Any] = config.get("callbacks")
    # 返回5个dataclass, ModelArguments, DataArguments, TrainingArguments, FinetuningArguments, GeneratingArguments
    model_args, data_args, training_args, finetuning_args, generating_args = get_train_args(args)

    callbacks.append(LogCallback())
    if finetuning_args.pissa_convert:
        callbacks.append(PissaConvertCallback())

    if finetuning_args.use_swanlab:
        callbacks.append(get_swanlab_callback(finetuning_args))

    if finetuning_args.early_stopping_steps is not None:
        callbacks.append(EarlyStoppingCallback(early_stopping_patience=finetuning_args.early_stopping_steps))

    callbacks.append(ReporterCallback(model_args, data_args, finetuning_args, generating_args))  # add to last

    if finetuning_args.stage == "pt":
        run_pt(model_args, data_args, training_args, finetuning_args, callbacks)
    elif finetuning_args.stage == "sft":
        run_sft(model_args, data_args, training_args, finetuning_args, generating_args, callbacks)
    elif finetuning_args.stage == "rm":
        run_rm(model_args, data_args, training_args, finetuning_args, callbacks)
    elif finetuning_args.stage == "ppo":
        run_ppo(model_args, data_args, training_args, finetuning_args, generating_args, callbacks)
    elif finetuning_args.stage == "dpo":
        run_dpo(model_args, data_args, training_args, finetuning_args, callbacks)
    elif finetuning_args.stage == "kto":
        run_kto(model_args, data_args, training_args, finetuning_args, callbacks)
    else:
        raise ValueError(f"Unknown task: {finetuning_args.stage}.")

    if is_ray_available() and ray.is_initialized():
        return  # if ray is intialized it will destroy the process group on return

    try:
        if dist.is_initialized():
            dist.destroy_process_group()
    except Exception as e:
        logger.warning(f"Failed to destroy process group: {e}.")
可以看出,_training_function() 函数首先将传入的参数解析为5个dataclass:ModelArguments, DataArguments, TrainingArguments, FinetuningArguments, GeneratingArguments,随后依据不同的 stage(pt, sft, rm, ppo, dpo, kto)执行 run_{}() 函数进行训练。
如果不采用 Ray 分布式训练,那么直接调用 _training_function() 即可,否则需要构建一个关于 Ray 的 trainer,这通过下面函数实现:
_get_ray_trainer() 函数如下:
def get_ray_trainer(
    training_function: Callable,
    train_loop_config: dict[str, Any],
    ray_args: "RayArguments",
) -> "TorchTrainer":
    if not ray_args.use_ray:
        raise ValueError("Ray was not enabled. Please set `USE_RAY=1` to enable ray.")

    if ray_args.ray_init_kwargs is not None:
        ray.init(**ray_args.ray_init_kwargs)

    if ray_args.ray_storage_filesystem is not None:
        # this means we are using s3/gcs
        storage_path = ray_args.ray_storage_path
    else:
        storage_path = Path(ray_args.ray_storage_path).absolute().as_posix()

    trainer = TorchTrainer(
        training_function,
        train_loop_config=train_loop_config,
        scaling_config=ScalingConfig(
            num_workers=ray_args.ray_num_workers,
            resources_per_worker=ray_args.resources_per_worker,
            placement_strategy=ray_args.placement_strategy,
            use_gpu=True,
        ),
        run_config=RunConfig(
            name=ray_args.ray_run_name,
            storage_filesystem=ray_args.ray_storage_filesystem,
            storage_path=storage_path,
        ),
    )
    return trainer
该函数将训练所需函数 _training_function(),训练参数配置 training_loop_config,分布式训练参数 ray_args 封装为一个 TorchTrainer 类型的 trainer。
3. 解析 run_sft() 函数
run_sft() 路径:src/llamafactory/train/sft/workflow.py
def run_sft(
    model_args: "ModelArguments",
    data_args: "DataArguments",
    training_args: "Seq2SeqTrainingArguments",
    finetuning_args: "FinetuningArguments",
    generating_args: "GeneratingArguments",
    callbacks: Optional[list["TrainerCallback"]] = None,
):
    tokenizer_module = load_tokenizer(model_args)
    tokenizer = tokenizer_module["tokenizer"]
    template = get_template_and_fix_tokenizer(tokenizer, data_args)
    dataset_module = get_dataset(template, model_args, data_args, training_args, stage="sft", **tokenizer_module)
    model = load_model(tokenizer, model_args, finetuning_args, training_args.do_train)
    ...

    # Create model card
    create_modelcard_and_push(trainer, model_args, data_args, training_args, finetuning_args)
run_sft() 函数工程比较大,内部层层调用了其他函数,但是看懂了 run_sft() 就能快速看懂其他训练模式如 run_pt(),下面给出每个部分的逻辑框架。
3.1. tokenizer 加载
**tokenizer_module = load_tokenizer(model_args)**
load_tokenizer # 加载预训练的tokenier与可选的processor
├── _get_init_kwargs # 尝试下载模型权重pt文件,并获得加载的tokenizer参数
├── AutoTokenizer.from_pretrained # 加载tokenizer,处理文本模态
├── patch_tokenizer # 对加载的tokenizer配置进行合适的调整
├── AutoProcessor_from_pretrained # 加载processor,包含image processor等,处理其他模态
├── patch_processsor # 对加载的processor配置进行合适的调整
└── return: {"tokenizer": tokenizer, "processor": processor}
3.2. template 加载
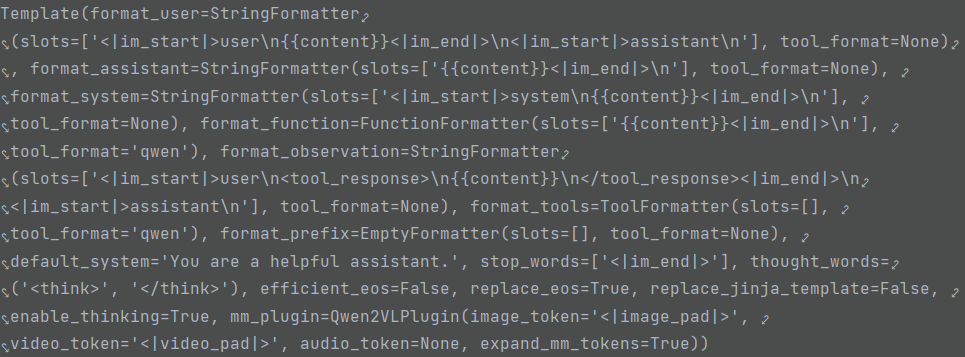
**template = get_template_and_fix_tokenizer(tokenizer, data_args)**
get_template_and_fix_tokenizer
├── register_template # 将现有各种模型使用的template注册为Template dataclass
├── template=TEMPLATE[data_args.template] # 从注册的template中加载数据参数指定的template
├── data_args.tool_format # if not None, 设定template.format_function与template.format_tools
├── data_args.default_system # if not None, 设定template.default_system
├── data_args.enable_thinking # 是否为推理模型开启thinking
├── template.fix_special_tokens # 确保使用template前,tokenizer有合适的eos token, pad token, 以及视作stop word的特殊token
├── template.fix_jinja_template # 将template定义的Jinja模板字串注入tokenizer的chat_template
└── return: ***template*** # Template dataclass
3.3. dataset 加载
**dataset_module = get_dataset(template, model_args, data_args, training_args, stage="sft", **tokenizer_module)**
get_dataset
├── data_args.tokenized_path # if not None, 从磁盘加载dataset
├── _get_merged_dataset # 加载dataset
│		├── _get_dataset_list # 获得要加载数据集的路径list, list[DatasetAttr]
│   ├── _load_single_dataset # 加载单个数据集并将样本组织格式标准化
│   │   ├── data_files # 需要加载的数据集的路径
│   │   ├── load_dataset # 从路径中加载数据集
│   │   ├── dataset.select # 确保数据集大小与dataset_attr定义的一致,且不超过max_samples
│   │   └── align_dataset # 将数据集中样本组织格式标准化
│		│		│		├── dataset_converter=get_dataset_converter # 从DATASET_CONVERTER=[AlpacaDatasetConverter, SharegptDatasetConverter]中选择
│   │   │   └── ***dataset.map(dataset_converter, ...)*** # 将数据集样本格式转化为: dict{key: "_prompt", "_response", "_systerm", "tools", "images", "videos", "audios"}
│   ├── merge_dataset # 依据不同mix_strategy将多个dataset合成为一个dataset
│   └── return: Union[Dataset, IterableDataset]
├── _get_process_dataset # 对dataset进行预处理
│   ├── dataset_processor=_get_dataset_processor
│   │   ├── dataset_processor_class=PackSupervisedDatasetProcessor # 选择processor
│   │   └── dataset_processor_class(template, tokenizer, processor, data_args) # 实例化
│   ├── dataset.map(dataset_processor.preprocess_dataset)
│   │   ├── _encode_data_example
│   │   │   ├── template.mm_plugin.process_message
│   │   │   ├── template.mm_plugin.process_tokenids
│   │   │   ├── ***template.encode_multirun***# 将example处理为问答对的token_ids, type: tuple(list[int], list[int])
│   │   │   └── return: input_ids, ***labels*** # list[int], list[int]
│   │   ├── model_inputs # 使用greedy策略对输入的多个样本进行packing节省padding空间,并获取pack后sentence的attention_mask
│   │   └── return model_inputs # dict{key: "input_ids", "attention_mask", "position_ids", "labels", "images", "videos", "audios"}
│   └── return: Union[Dataset, IterableDataset]
├── split_dataset # 划分数据集为train, val, (test)
├── data_args.tokenized_path # if None, 将tokenize后的数据存到磁盘
├── get_dataset_module # 将划分的数据集存到dict中
└── return {"train_dataset": train_dataset, "eval_dataset": eval_dataset}
3.4. model 加载
**model = load_model(tokenizer, model_args, finetuning_args, training_args.do_train)**
load_model
├── _get_init_kwargs
├── load_config # 识别模型类型并加载配置,type: "PretrainedConfig"
├── patch_config # 为模型配置文件进行适当修正
│   ├── configure_attn_implementation
│   ├── configure_rope
│   ├── configure_longlora
│   ├── configure_quantization
│   ├── configure_moe
│   ├── configure_visual_model
│   ├── configure_packing
│   ├── configure_kv_cache
│   ├── ...
├── apply_liger_kernel # liger kernel能显著提升训练效率,大幅减少显存使用
├── if model_args.use_unsloth: # 通过unsloth加载预训练模型
│   ├── ...
├── if model is None and not lazy_load: # 通过HuggingFace.transformers中的AutoModelFor{ImageTextToText, CausalLm, ...}加载training from scratch/pretrained模型
│   ├── ...
├── if not lazy_load:
│   ├── patch_model # 设置layernorm,gradient checkpoint,lm_head与mm projector精度等
│   ├── register_autoclass
├── init_adapter # 初始化adapter, full/freeze/lora三种模式中选择
│   ├── _setup_full_tuning
│   ├── _setup_freeze_tuning
│   ├── _setup_lora_tuning
├── if add_valuehead:
│   ├── ...
├── if not is_trainable: # 若模型不处于训练阶段, 关闭梯度, 将数据类型调整为模型计算类型, 开启model.eval(), 否则开启model.train()
├── count_parameters # 获取model trainable参数与total参数
└── return model # type: PretrainedModel
3.5. 设置 data_collater
data_collator = SFTDataCollatorWith4DAttentionMask( # 数据进一步处理: 处理其他模态数据输入; 2d mask -> 4D mask
    template=template,
    model=model if not training_args.predict_with_generate else None,
    pad_to_multiple_of=8 if training_args.do_train else None,  # for shift short attention
    label_pad_token_id=IGNORE_INDEX if data_args.ignore_pad_token_for_loss else tokenizer.pad_token_id,
    block_diag_attn=model_args.block_diag_attn,
    attn_implementation=getattr(model.config, "_attn_implementation", None),
    compute_dtype=model_args.compute_dtype,
    **tokenizer_module,
)
data_collator 的作用是在后续传入 HuggingFace.transformers.Seq2SeqTrainer 初始化 trainer 时,对传入的数据集样本做进一步整理,这里首先对除文本外其他模态数据预处理,随后将 batch sanmple 中的 2D attention mask 转化为 4D attention mask。其逻辑如下:
def __call__(self, features: list[dict[str, Any]]) -> dict[str, "torch.Tensor"]:
    features = super().__call__(features)
    if self.block_diag_attn and self.attn_implementation != "flash_attention_2":
        features["attention_mask"] = prepare_4d_attention_mask(features["attention_mask"], self.compute_dtype)

    for key, value in features.items():  # cast data dtype for paligemma
        if torch.is_tensor(value) and torch.is_floating_point(value):
            features[key] = value.to(self.compute_dtype)

    return features
可以看出,它首先调用父类的__call__() 方法对输入的 features 处理,其核心想法为:先获取batch中的 images, videos 等其他模态数据,并判断是否为空,若为空则定义 fake_input_ids, fake_images 等,随后送入 self.template.mm_plugin.get_mm_inputs 得到mm_inputs (对于 image,涉及将图像像素数量压缩到指定范围等操作),并用 mm_inputs 更新输入的 features:features.update(mm_inputs) 。
prepare_4d_attention_mask 将 2D mask 转化为 4D mask,即 *(batch_size, seq_len) to (batch_size, 1, seq_len, seq_len)* 。
3.6. 设置 metric
metric_module = {}
if training_args.predict_with_generate: # 生成式预测计算指标
    metric_module["compute_metrics"] = ComputeSimilarity(tokenizer=tokenizer) # 计算指标: rouge-1, rouge-2, rouge-l, bleu-4
elif finetuning_args.compute_accuracy:
    metric_module["compute_metrics"] = ComputeAccuracy() # token-level预测准确率
    metric_module["preprocess_logits_for_metrics"] = eval_logit_processor # 计算具有最大可能性的token以减少内存占用

# Keyword arguments for `model.generate`
gen_kwargs = generating_args.to_dict(obey_generation_config=True)
gen_kwargs["eos_token_id"] = [tokenizer.eos_token_id] + tokenizer.additional_special_tokens_ids
gen_kwargs["pad_token_id"] = tokenizer.pad_token_id
3.7. trainer 初始化
trainer = CustomSeq2SeqTrainer(
    model=model,
    args=training_args,
    finetuning_args=finetuning_args,
    data_collator=data_collator,
    callbacks=callbacks,
    gen_kwargs=gen_kwargs,
    **dataset_module,
    **tokenizer_module,
    **metric_module,
)
CustomSeq2SeqTrainer 继承自 HuggingFace.transformers 的 Seq2SeqTrainer,这里单独设置了save_predictions 方法,并对 optimizer, schedule 等方法进行 override。
这个 class 实例化后,会将 dataset_module 解包为 train_dataset 和 eval_dataset 分别用于 train 和 eval 阶段,tokenizer_module 与 metric_module 也会解包传入。在训练时会调用传入的 data_collator 对数据处理。
3.8. training, evaluating, predict
**# Training**
if training_args.do_train:
    train_result = trainer.train(resume_from_checkpoint=training_args.resume_from_checkpoint)
    trainer.save_model() # save模型权重, 配置, tokenizer
    if finetuning_args.include_effective_tokens_per_second:
        train_result.metrics["effective_tokens_per_sec"] = calculate_tps(
            dataset_module["train_dataset"], train_result.metrics, stage="sft"
        )

    trainer.log_metrics("train", train_result.metrics)
    trainer.save_metrics("train", train_result.metrics)
    trainer.save_state() # save训练中间状态(优化器等),方便断点续训
    if trainer.is_world_process_zero() and finetuning_args.plot_loss:
        keys = ["loss"]
        if isinstance(dataset_module.get("eval_dataset"), dict):
		        # sum([[a, b], [c, d]], []) → [a, b, c, d]
            keys += sum(
                [[f"eval_{key}_loss", f"eval_{key}_accuracy"] for key in dataset_module["eval_dataset"].keys()], []
            )
        else:
            keys += ["eval_loss", "eval_accuracy"]

        plot_loss(training_args.output_dir, keys=keys)

if training_args.predict_with_generate:
    tokenizer.padding_side = "left"  # use left-padding in generation

**# Evaluation**
if training_args.do_eval:
    metrics = trainer.evaluate(metric_key_prefix="eval", **gen_kwargs)
    trainer.log_metrics("eval", metrics)
    trainer.save_metrics("eval", metrics)

**# Predict**
if training_args.do_predict:
    logger.warning_rank0_once("Batch generation can be very slow. Consider using `scripts/vllm_infer.py` instead.")
    predict_results = trainer.predict(dataset_module["eval_dataset"], metric_key_prefix="predict", **gen_kwargs)
    trainer.log_metrics("predict", predict_results.metrics)
    trainer.save_metrics("predict", predict_results.metrics)
    trainer.save_predictions(dataset_module["eval_dataset"], predict_results, generating_args.skip_special_tokens)

# Create model card
create_modelcard_and_push(trainer, model_args, data_args, training_args, finetuning_args)
4. 实例化测试
template = get_template_and_fix_tokenizer(tokenizer, data_args)
dataset.map(dataset_converter, …)
对于 1 个 sample (SharegptDatasetConverter)
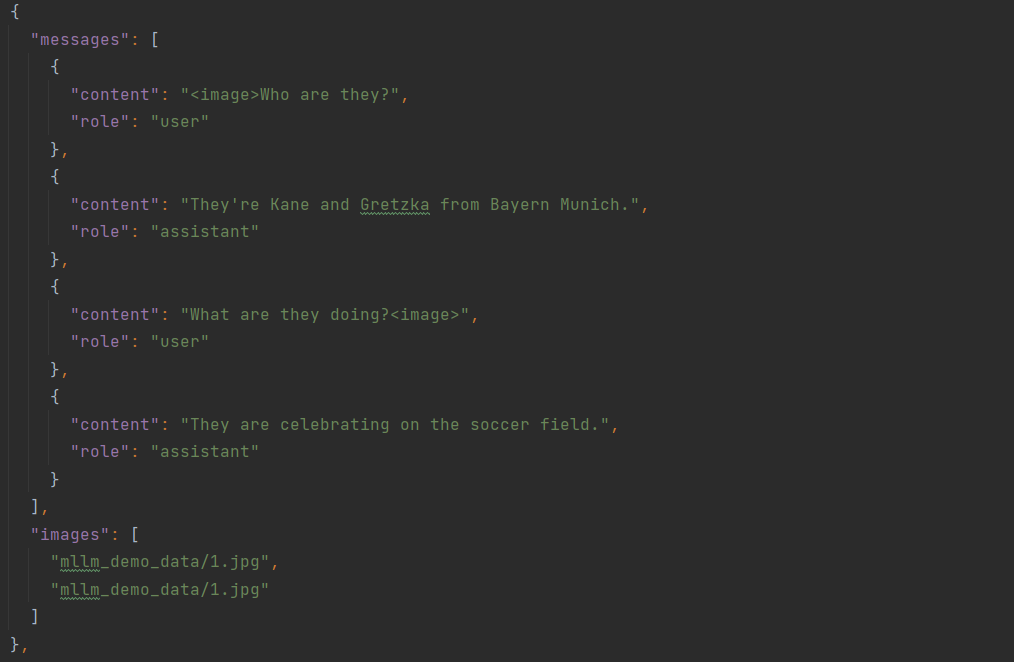
先抽出 “messages” 并转化为 aligned_messages:

[
    {'role': 'user', 'content': '<image>Who are they?'},
    {'role': 'assistant', 'content': "They're Kane and Gretzka from Bayern Munich."},
    {'role': 'user', 'content': 'What are they doing?<image>'},
    {'role': 'assistant', 'content': 'They are celebrating on the soccer field.'}
]
随后通过如下代码
else:  # normal example
    prompt = aligned_messages[:-1]
    response = aligned_messages[-1:]

output = {
    "_prompt": prompt,
    "_response": response,
    "_system": system,
    "_tools": example[self.dataset_attr.tools] if self.dataset_attr.tools else "",
    "_images": self._find_medias(example[self.dataset_attr.images]) if self.dataset_attr.images else None,
    "_videos": self._find_medias(example[self.dataset_attr.videos]) if self.dataset_attr.videos else None,
    "_audios": self._find_medias(example[self.dataset_attr.audios]) if self.dataset_attr.audios else None,
}
return output
得到 align 后的数据格式:

{
    '_prompt': [
                   {'role': 'user', 'content': '<image>Who are they?'},
 		   {'role': 'assistant', 'content': "They're Kane and Gretzka from Bayern Munich."},
		   {'role': 'user', 'content': 'What are they doing?<image>'}
	       ],
    '_response': [
		     {'role': 'assistant', 'content': 'They are celebrating on the soccer field.'}
		 ],
    '_system': '',
    '_tools': '',
    '_images': ['data\\mllm_demo_data/1.jpg', 'data\\mllm_demo_data/1.jpg'],
    '_videos': None,
    '_audios': None
}
encoded_pairs = self.template.encode_multirun(self.tokenizer, messages, system, tools)
在 encode_multirun 之前,一个 batch 的 sample 会做转换:list[dict{"str": Any}] -> dict{"str": list[Any]} ,随后从 “_prompt” 等 keys 中提取第 i 个 sample 的属性,以下面这个 sample 为例:
{
    "_prompt": [
	           {'content': "Identify the types of technology used in this passage.\nDesign thinking is a human-centered approach to innovation that draws from the designer's toolkit to integrate the needs of people, the possibilities of technology, and the requirements for success.", 'role': 'user'}
	       ],
    "_response": [
		     {'content': 'The technology mentioned in this passage is not specified, but rather is referred to generally as "the possibilities of technology" in the context of the design thinking approach to innovation.', 'role': 'assistant'}
 		 ],
    "_system": '',
    "_tools": '',
    "_images": '',
    "_videos": '',
    "_audios": ''
}
随后对单个 sample,首先将 message 中相应内容插入预定义的 template 中的 slot,从而得到数据的对话模板,并将其用 tokenizer 编码为 list[int],即
# first loop
## elements
[
    '<|im_start|>system\nYou are a helpful assistant.<|im_end|>\n',
    "<|im_start|>user\nIdentify the types of technology used in this passage.\nDesign thinking is a human-centered approach to innovation that draws from the designer's toolkit to integrate the needs of people, the possibilities of technology, and the requirements for success.<|im_end|>\n<|im_start|>assistant\n"
]
## encoded_messages
[
    [151644, 8948, 198, 2610, 525, 264, 10950, 17847, 13, 151645, 198, 151644, 872, 198, 28301, 1437, 279, 4494, 315, 5440, 1483, 304, 419, 21085, 624, 20470, 7274, 374, 264, 3738, 49382, 5486, 311, 18770, 429, 26643, 504, 279, 14692, 594, 65894, 311, 31072, 279, 3880, 315, 1251, 11, 279, 23607, 315, 5440, 11, 323, 279, 8502, 369, 2393, 13, 151645, 198, 151644, 77091, 198]
]

# second loop
## elements
[
    'The technology mentioned in this passage is not specified, but rather is referred to generally as "the possibilities of technology" in the context of the design thinking approach to innovation.<|im_end|>\n'
]
## encoded_messages
[
    [151644, 8948, 198, 2610, 525, 264, 10950, 17847, 13, 151645, 198, 151644, 872, 198, 28301, 1437, 279, 4494, 315, 5440, 1483, 304, 419, 21085, 624, 20470, 7274, 374, 264, 3738, 49382, 5486, 311, 18770, 429, 26643, 504, 279, 14692, 594, 65894, 311, 31072, 279, 3880, 315, 1251, 11, 279, 23607, 315, 5440, 11, 323, 279, 8502, 369, 2393, 13, 151645, 198, 151644, 77091, 198],
    [785, 5440, 9733, 304, 419, 21085, 374, 537, 5189, 11, 714, 4751, 374, 13862, 311, 8789, 438, 330, 1782, 23607, 315, 5440, 1, 304, 279, 2266, 315, 279, 2884, 7274, 5486, 311, 18770, 13, 151645, 198]
]
labels
[-100, -100, -100, -100, -100, -100, -100, -100, -100, -100, -100, -100, -100, -100, -100, -100, -100, -100, -100, -100, -100, -100, -100, -100, -100, -100, -100, -100, -100, -100, -100, -100, -100, -100, -100, -100, -100, -100, -100, -100, -100, -100, -100, -100, -100, -100, -100, -100, -100, -100, -100, -100, -100, -100, -100, -100, -100, -100, -100, -100, -100, -100, -100, -100, 785, 5440, 9733, 304, 419, 21085, 374, 537, 5189, 11, 714, 4751, 374, 13862, 311, 8789, 438, 330, 1782, 23607, 315, 5440, 1, 304, 279, 2266, 315, 279, 2884, 7274, 5486, 311, 18770, 13, 151645, 198]
做 labels 时,会将 prompt 部分的 token_id 换为 -100,表示 input 部分不需要标签。